Learn how to implement Consent Mode v2 with CookieYes and Google Tag Manager for privacy compliance and accurate data tracking.
Introduction
In today’s privacy-conscious world, obtaining user consent for cookie collection is essential. This article delves into Consent Mode v2, a framework that enables website owners to effectively manage user cookie consent using Google Tag Manager (GTM).
We will explore the benefits of Consent Mode v2 and provide step-by-step instructions for its implementation using GTM and CookiesYes.
I have uploaded a step-by-step YouTube video in Romanian with English subtitles available.
The Importance of Consent Mode v2
If you are using remarketing in Google Ads and targeting countries that have signed the Digital Markets Act (DMA), or if you are using Google Signals in Google Analytics 4, then you need to implement Consent Mode v2 on your website.
Even if you choose not to use Consent Mode v2 and continue tracking users in GA4 to some extent, there are some important considerations to keep in mind. You won’t be able to deliver personalized ads in Google Ads.
Consent Mode v2 provides several advantages:
- Enhanced User Control: Users have clear options regarding cookie usage, promoting trust and transparency.
- Improved Compliance: Stay compliant with data privacy regulations like GDPR by obtaining informed consent.
- Accurate Data Tracking: Ensure accurate data collection by respecting user consent preferences.
- SEO Benefits: Search engines may favor websites that demonstrate responsible user data practices.
Consent Mode in Google Tag Manager
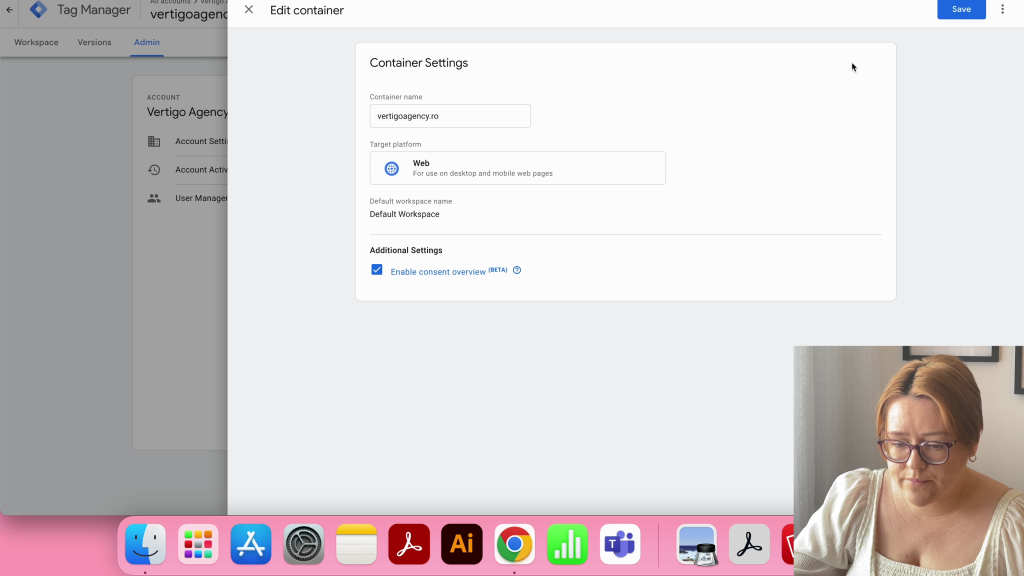
In Google Tag Manager, navigate to the Admin tab, then go to Container Settings and enable Consent Overview. It’s crucial to do this for all Tag Manager accounts.
CookieYes Integration of Consent Mode v2
CookieYes is the Consent Management Platform (CMP) I chose to set up the cookie banner. I won’t cover the setup of the CookieYes account as it involves relatively simple steps.
If you have used the CookieYes plugin for WordPress and want to integrate it with Google Tag Manager, you cannot have both the plugin and GTM implementation running at the same time. You need to deactivate the CookieYes plugin first and then follow the instructions provided within the Google Tag Manager platform.
After creating a CookieYes account, a site scan will take place to identify and categorize the cookies on your site. Access the Cookie Manager tab to ensure that the scanned cookies are categorized correctly.
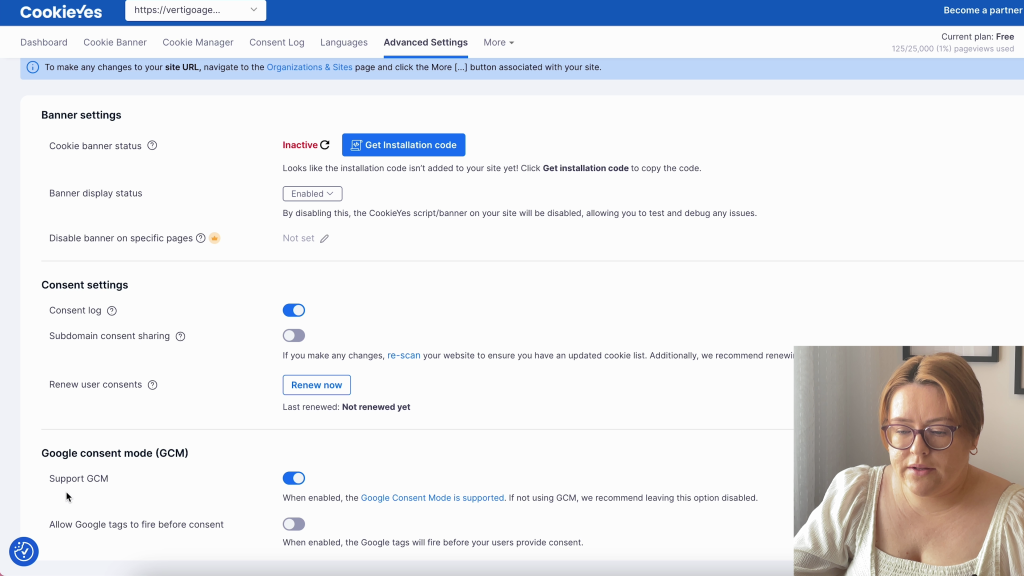
First, in the CookieYes platform’s Advanced Settings, check “Support Google Consent.”
Community Template for Consent Mode v2
To create a new tag, enter Google Tag Manager -> Tags and click on New.
Click on Tag Configuration section and access the Community Template Gallery – Discover more tag types in the Community Template Gallery.
Many popular CMPs provide an integration template for Consent Mode v2, including CookieYes. To locate CookieYes’s template, simply search for CookieYes, click on the result and then Choose Template.

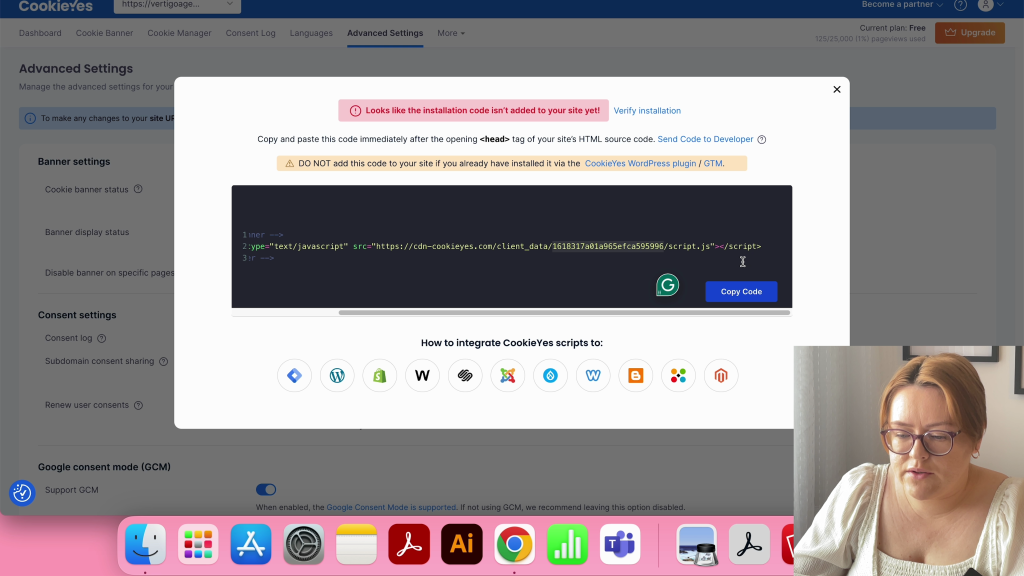
To set up the tag, you need a website key.
Get the website key in the Advanced Settings tab on your CookieYes account. Then, click on the ‘Get Installation Code‘ button, and you can find the website key between the data and script.js.
Copy the key and paste it into Tag Manager.
Tag & Trigger Config for CookieYes
To set the default state, you need to follow these steps:
- Ensure that the necessary cookies are correctly placed in this category – Check the Cookie Manager tab in your CookieYes account.
- Click on “Add Setting” and disable all cookies except for the necessary ones.
- Click on “Add” to save the new default state on your site.
- In “Other Settings,” check both boxes.
- Under “Triggering,” choose “Consent Initialization – All Pages” and click on “Save.”
- Finally, submit and publish this new tag in your container.
- CookieYes banner should appear now on your website.

Trigger for Existing Tags
Consent Mode v2 is not required for non-Google tags. However, to demonstrate transparency in handling user data, you may choose to implement it on all of your tags.
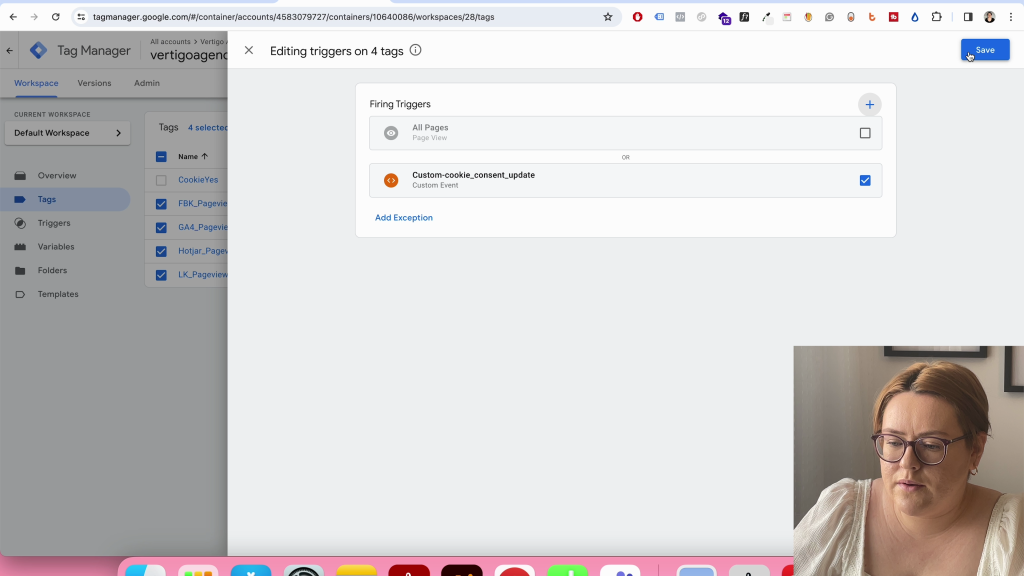
Let’s create a new trigger to fire the existing tags, such as tags created for Google, Facebook, LinkedIn, Hotjar, etc.
Go to Triggers -> New -> Trigger type: Custom event -> Event name: cookie_consent_update -> Save.

To set up the new trigger for your existing tags, follow these steps:
- In the Tags section, select your desired tags (Google, Facebook, LinkedIn, Hotjar, etc.). Do NOT select the CookieYes tag created previously.
- Click on the two-circle icon located on the top right corner to edit.
- Uncheck the previous triggering option, which is most likely set to All Pages.
- Click on the “+” button to add a new Custom Event.
- Set the Custom Event you created previously as a trigger for your selected tags.
- Save your changes.
- Finally, submit and publish the container.
Modes for Consent Mode v2
Let’s discuss the Google’s documentation. Consent Mode v2 has two implementation modes, Basic and Advanced.
- In Basic mode, if a user chooses not to accept any cookies on your site, neither Google nor you will be able to track that user. This means they will be an invisible user on your site, and you will not be able to see them in the reports.
- In Advanced mode, Google suggests sending a cookieless pin to them, even if the user has not accepted any cookies. This pin will indicate that a user visited your site. Google will only be able to model the data in GA4, but these users will remain invisible.
The Basic Mode of Consent Mode v2
To manage the consent options for your tags in your Workspace, follow these steps:
- In Google Tag Manager, on the Tags section, click on the shield icon located at the top-right corner of the page – Consent overview. This will open a new window.
- Here, you will see the consent options for each tag.
- For tags such Google, Facebook, LinkedIn, and Hotjar, additional consents need to be set.
- To set additional consent for your tags, select them and click on the shield icon from the top-right corner.
- Next, check the Require additional consent for tag to fire option.
- Set additional consent for GA4. Select the tag and enable the analytics_storage consent option and click Save.
- For example, Facebook or LinkedIn tags should require additional consent for ad_storage. Add it and click Save.
- Make sure to set this additional consent for all the tags, depending on their purpose.


The Advanced Mode of Consent Mode v2
To enable Advanced Mode, follow these steps:
- In Google Tag Manager, in the Tags section, click on the shield icon located in the top-right corner to access the Consent Overview.
- Next, select the Google tags you have – GA4, Google Ads, Conversion linker. Select them and click on the shield icon from the top-right corner.
- Check the “Not set” option and you’re all done!

We need to remove the custom trigger we had set for these Google Tags. We will modify the trigger from Custom Event to Consent Initialization – All Pages. Once done, click “Save” and then “Submit and Publish.”

Key Takeaways Consent Mode v2
Here are the steps to implement Consent Mode v2, Basic, and Advanced Mode.
If you’re interested in learning how to properly test your implementation, I recommend checking out a video that I recently posted on YouTube. The video provides comprehensive guidance on using Google Dev Tools to test your implementation effectively. You’ll learn how to leverage the various tools within Google Dev Tools to test for issues, check your code for errors, and ensure that your implementation is working as intended.
This video is an excellent resource for anyone looking to optimize their implementation testing process, and I highly recommend giving it a watch.
Best Practices for SEO-Friendly Cookie Consent
- Clear and Concise Banner: Design a user-friendly cookie banner that clearly explains the purpose of cookies and provides easy-to-understand consent options.
- Multiple Consent Options: Offer granular control for users to choose which cookies they consent to (e.g., necessary, analytics, advertising).
- Respect User Choice: Strictly adhere to user consent preferences and avoid using workarounds to circumvent consent.
- Data Minimization: Collect only the minimum data necessary for website functionality and user experience.
- Transparent Privacy Policy: Maintain a readily accessible and up-to-date privacy policy detailing your data collection practices.
Conclusion
Remember to implement Consent Mode v2 with GTM to give users control over their data, ensure compliance, and accurately collect data. It’s important to prioritize a user-centric approach for better SEO and user trust.
The content focuses on implementation and doesn’t delve into the legal aspects of Consent Mode v2. It’s recommended to consult with a legal professional for legal compliance.
What are your thoughts? Feel free to message me here.
Flavia Groza-Bocăneț